3 Hour Garum Recipe

Garum, an umami-rich sauce made from fermented proteins, is like magic. Packed with glutamates that make dishes taste more savory, garum can transform a dish with just a dash.
If you haven’t had garum, it’s probably because it’s so difficult to make. Most recipes take four months, and many require that the sauce be kept at specific temperatures over that entire period.
Thankfully, I figured out a way to hack dietary supplements to make authentic garum in an insane 3 hours. And I can’t believe it works.
What’s garum?
Garum is a sauce category that originated thousands of years ago in ancient Greece and Rome. It was originally produced by leaving salted fish in a vessel in the sun until the enzymes in the fish’s intestines fermented the fish into a sauce. Garums with fish are commonly used today: both fish sauce and Worcestershire sauce are made from fermented fish.
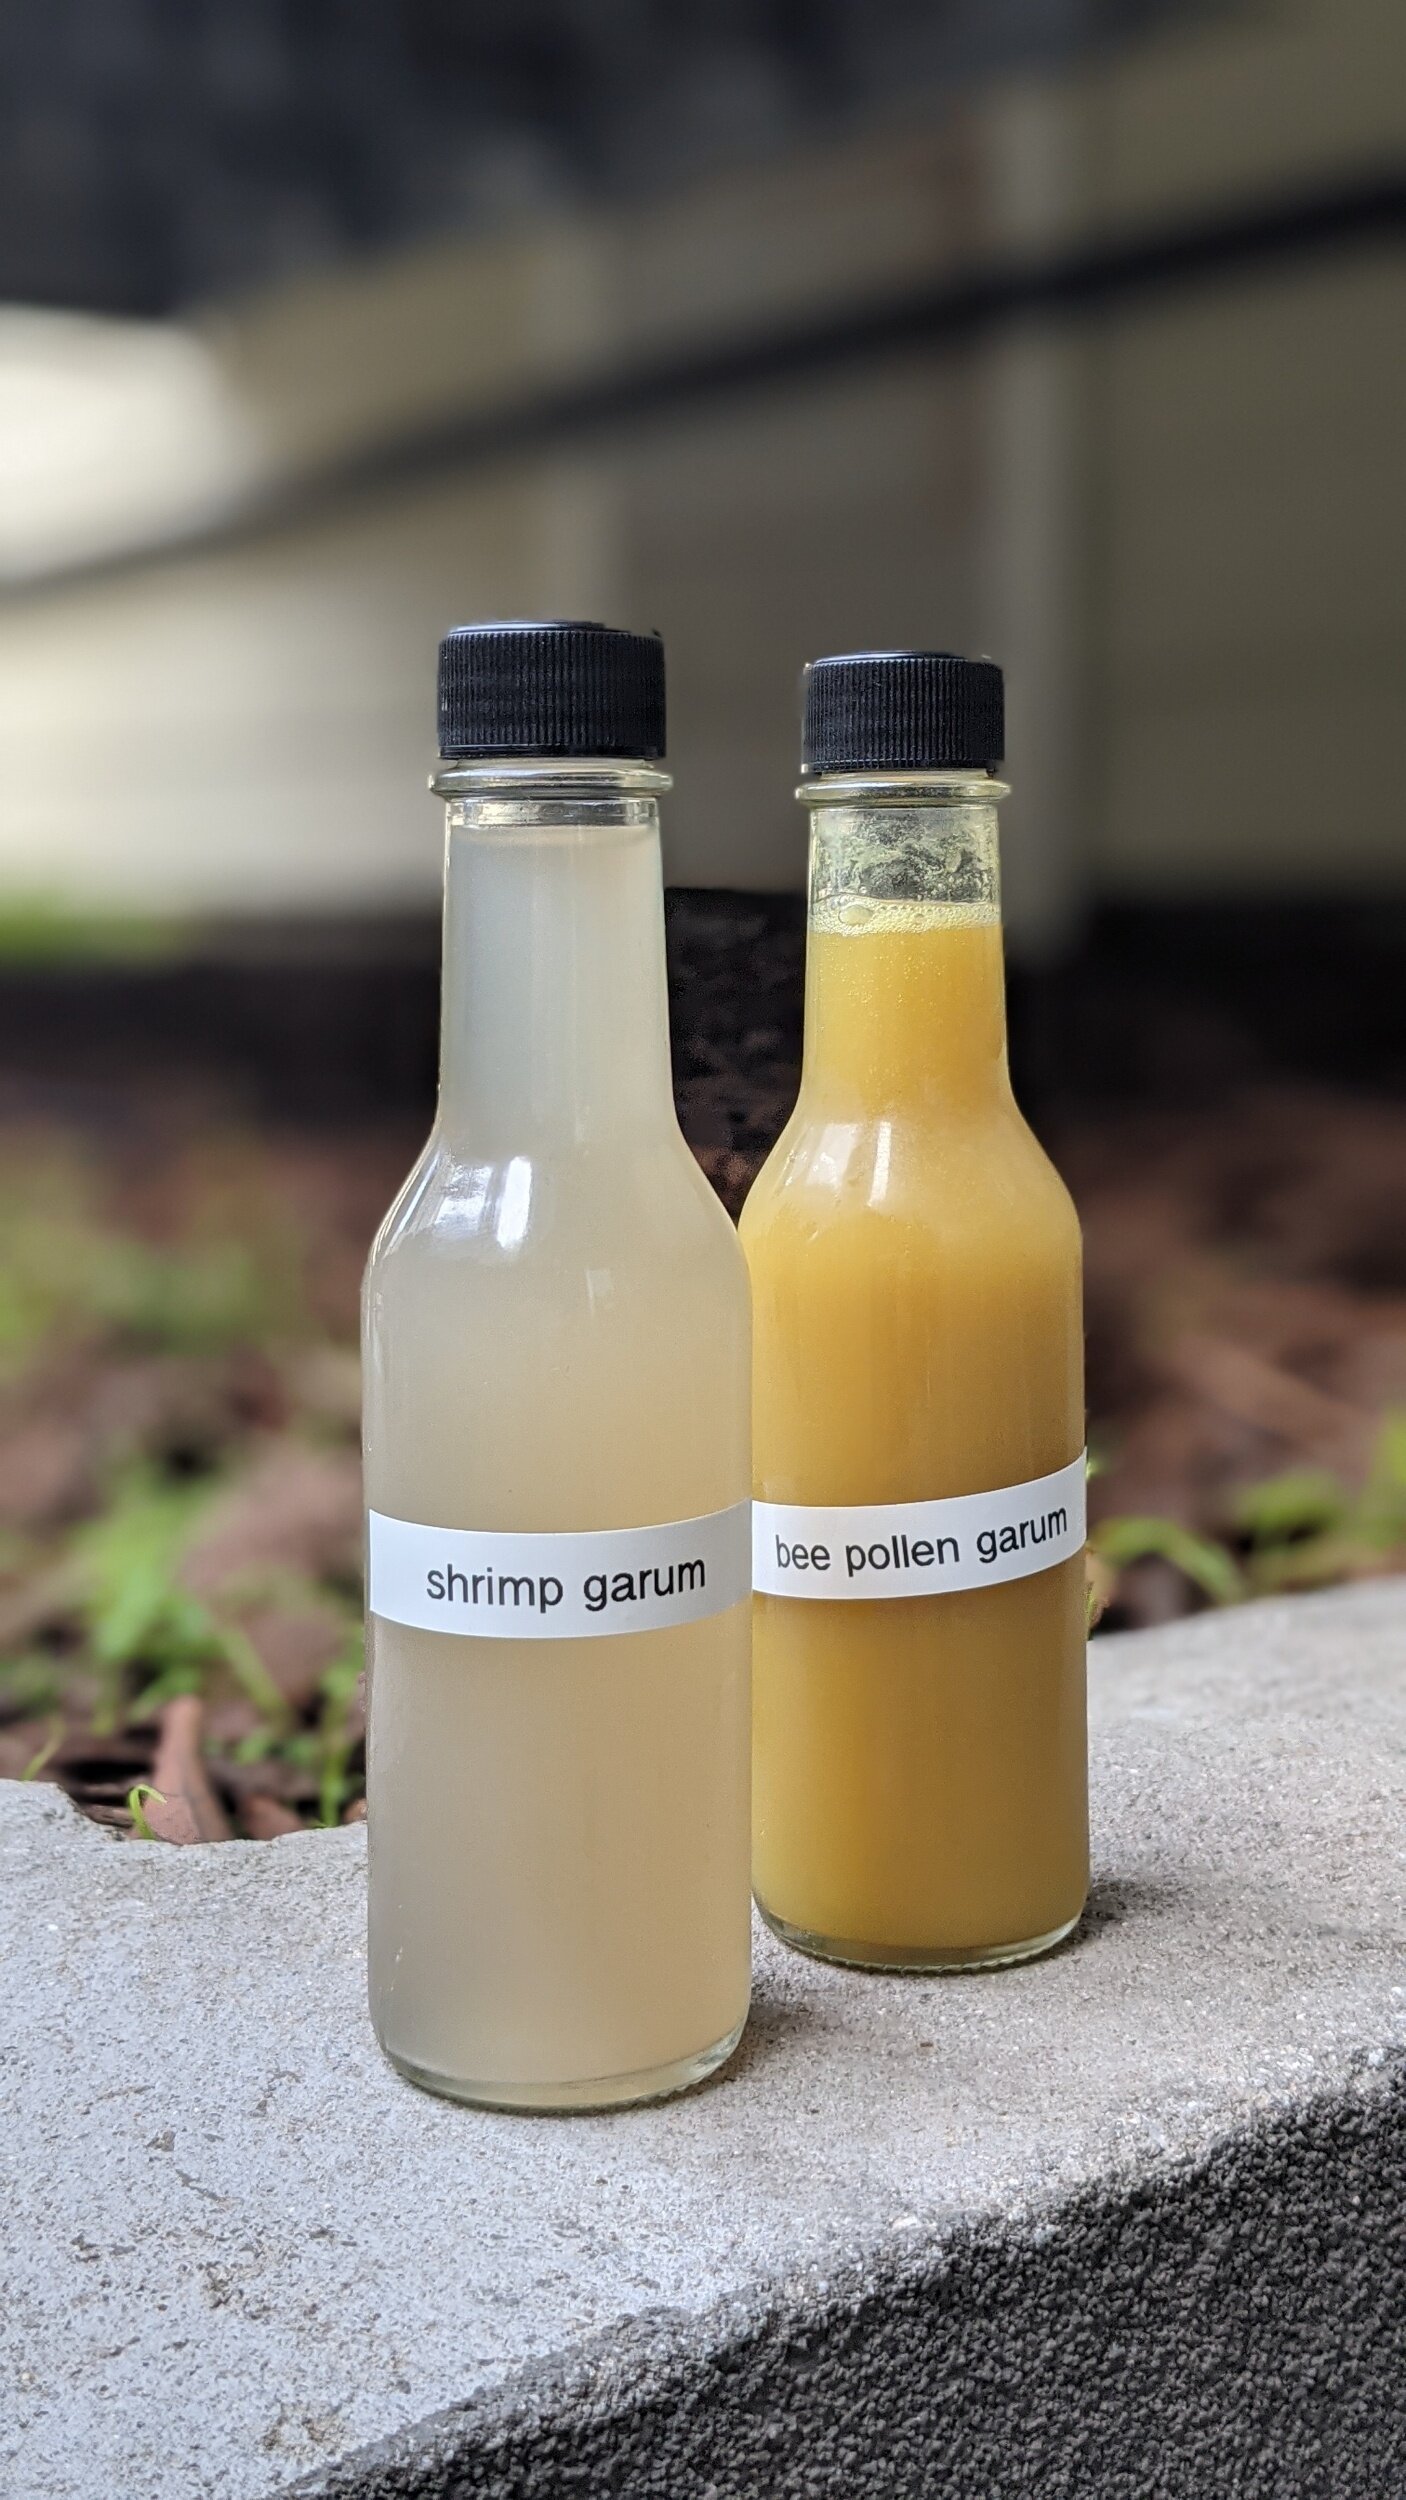
While fish sauce is the most popular type of garum, Noma and other trailblazing restaurants have recently popularized garums made from beef, roasted chicken wings, and even bee pollen. These alternative garums lack the fishy smell but do not lack garum’s most prized characteristic: intense umami.
The fermentation process is responsible for garum’s uniquely umami-rich taste. During fermentation, protease enzymes break down the proteins of the chosen ingredients, transforming those proteins from complex molecules into simpler ones. These simpler molecules are easier for our taste buds to understand, so they taste more intense and delicious. One of the resulting molecules of this enzymatic transformation is glutamate — the source of umami.
How is garum made?
Garum is traditionally made from one of two methods:
Leveraging enzymes in animal intestines: This is the traditional method wherein protease from the animal’s intestines (which are typically used by the animal to digest food) are used to ferment the animal itself. For example, when whole dead fish are placed in a vessel, the enzymes from the fish’s intestines eat away at the other parts of the fish (i.e. which had never touch the enzymes during the fish’s life). This process typically occurs at room temperature (with a great deal of salt for preservation) and takes many months to finish.
Leveraging enzymes from koji production: When koji mold grows on starches, it secretes protease. In modern garum methods pioneered by Noma and others, koji is mixed with protein and held at 140f for many months until the enzymes fully transform the proteins into glutamate.
As you can see, both methods take many months – not ideal for someone with impatience or the desire to iterate on recipes.
ACCELERATING GARUM PRODUCTIOn
In early 2019, Noma Ferments posted on Instagram about an alternative method for fermenting garum that takes only 6 hours. In the post, the team described blending pork pancreas (which is rich in protease) with meat to liquify the pork pancreas into garum via a process called pancreatic hydrolysis. The results, they said, were “reminiscent of the powdered chicken soup mix you get with ramen but taste intensely of the original product.”
I was fascinated, but I quickly found it near impossible to find pancreas for sale. I talked with butchers, farmers, you name it. All considered pork pancreas to be waste that should never be sold to consumers. And in California, its apparently illegal to sell without a separate USDA inspection.
Eventually, I found a site selling bison pancreas, but it cost a lot of money. I bought it anyways. To my surprise, after several iterations, the recipe worked. Unfortunately, however, the bison flavor was mildly present in the sauces. And I was still quite bothered by how much it cost to produce such little product.
Enter Amazon. On a whim, I decided to search for pancreas on Amazon. To my surprise, there were tons of results, all pancreas-based dietary supplements that are apparently used by people that need a little bit of a protease boost. Pork, beef, lamb — these people and their supplements really had quite the selection. Most of these supplements were described as freeze-dried, never heat-treated pancreas. In my mind, this hinted to the fact that the protease might still be active, meaning that they might be suitable for garum production.
So I bought an inexpensive pork pancreas supplement and tried it in various garum trials. Amazingly, I found a recipe that works, and it works really well. It only takes three hours! It almost feels impossible to say aloud: I found a way to make garum in 3 hours using dietary supplements from Amazon. Hell yes. Let’s get to the recipe.
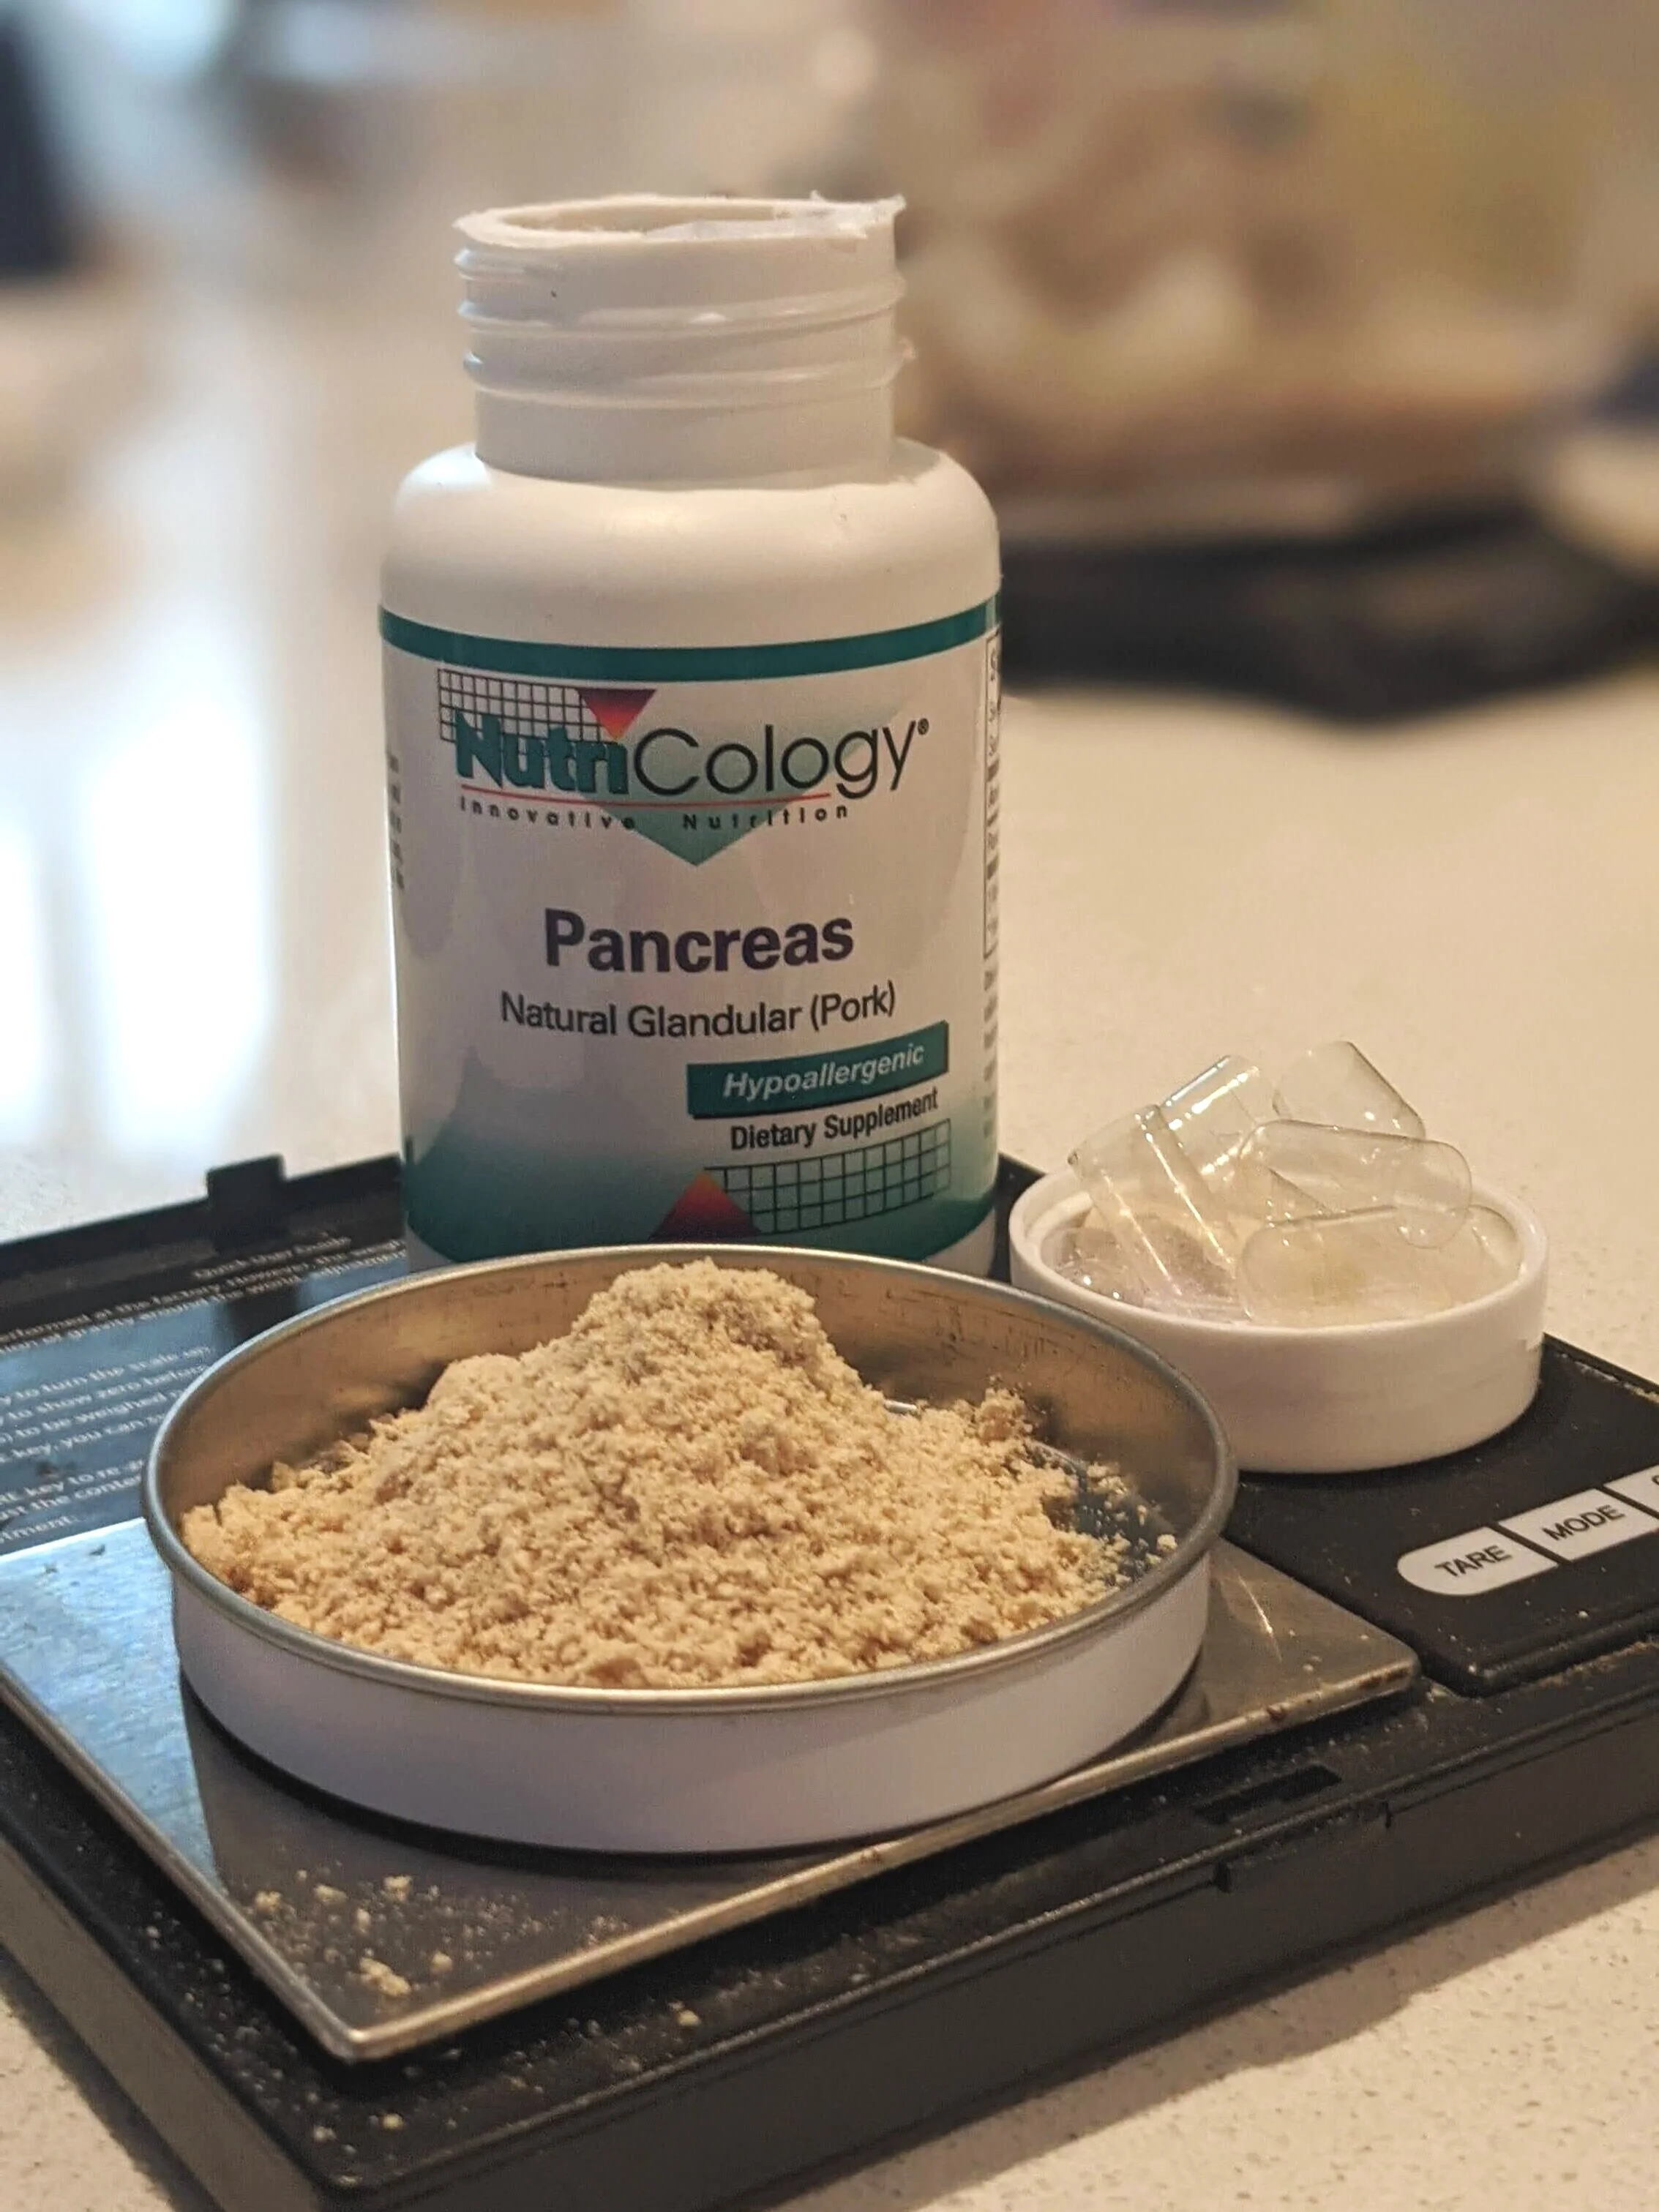
Freeze-dried pancreas is removed from the supplement capsules before cooking.
The INGREDIENTS AND equipment
Here’s what you’ll need to make the homemade garum recipe. For a deeper dive into alternative substrates and enzymes (including vegan ones!), check my follow-up post.
1. Freeze-dried pancreas supplement: You need freeze-dried pancreas with an active and ample supply of protease enzymes. I use this pork pancreas supplement here. If you don’t eat pork, please try the beef or lamb supplements from the same company and report back!
Each capsule (which can easily be pulled apart with your fingers) contains about 0.6g of freeze-dried pancreas.

2. Protein-rich substance: You will need to choose what you’re going to turn into garum. You want something that is high in protein and low in fat. I recommend one of the following:
Shellfish (shrimp, scallop, lobster)
Squid
Beef tenderloin (with fat cut off)
Chicken breast or wings (with seared skin!)
Bee pollen (double the water required)
Chicatana ants (triple the water required)
Egg whites
You can either use the food raw or cook it first to provide additional flavor from searing and browning.
3. Immersion circulator: This recipe calls for the protein to be kept at 140f for around three hours. The best way to keep it at temperature like this is to do it sous vide. I’ve owned multiple immersion circulators for sous vide, but I prefer my Joule.
You’ll also need a gallon-sized freezer bag to cook the garum in.
4. Kitchen scales: You need one scale that measures to the gram and one that measures to the 100th of a gram.
The RECIPE
Getting the pancreas was the hardest part. Now for the home stretch:
Take the protein-rich food of your choice, remove any visible fat, and cut it into small pieces. Weigh it.
Add the chopped protein to a blender, then add at least half of the protein’s weight in water to the blender, too. Blend.
Remove freeze-dried pancreas powder from the pill capsules by pulling them apart. Add 1% of the protein’s weight in powder to the blender. Blend briefly, then transfer the sludgy result to a freezer bag.
Cook the sludge at 140ºf for about three hours, agitating it periodically to ensure it is well mixed. You’ll notice that the sludge becomes completely liquified within 30 minutes. I keep it going for three hours to ensure that the meat is cooked (and that most harmful bacteria are killed), but it appears most of the work is done after those 30 minutes.
Strain the liquid and you’re done!
If you want your garum to be clarified rather than cloudy, you’ll have to clarify it with the freezer method. To do so:
Freeze the garum until totally solid.
Transfer the frozen garum to a fine strainer placed over a bowl placed in the fridge. As the garum defrosts, clear liquid will strain into the bowl while leaving the impurities in the strainer above.
Preserving your garum
Unlike a traditional garum, this garum isn't preserved yet. There are many methods for preserving your garum, but the most obvious method is to add salt. You should do this step after clarifying your garum.
It’s difficult to recommend the exact salt level necessary to preserve a garum without measuring the garum’s water activity, so I recommend the following conservative options:
Add 11% salt to store your garum in the fridge.
Add 20% salt to store your garum at room temperature.
Another way to increase the shelf-life of your garum is to kill any harmful bacteria before you bottle it. Once you add salt to your finished garum, heat it to 185ºF for 10 minutes.
You can add much less salt if you plan to refrigerate then use your garum in just a few days.